
Introduction:
Liferay is java portal which provides many features in real world web application development. It offers many features so any user can create website and design website according to their needs.
It offers much dynamic functionality simply by configuration rather than programming.
Any end user with minimum knowledge they can design website and publish in the internet
Not only static websites, liferay offers rich dynamic features so that we can make very good dynamic website without any programming.
Objective:
Building website using Liferay Portal
Prerequisites:
We need to install liferay portal
We have different models in Liferay like Site, Organization and User Groups
Please follow the following article for more information
What is website?
Website is set of resources like html pages, images and other dynamic functionality like forms submission and display dynamic data in pages.
What we should know before start design website?
We need to know basics about HTML, CSS.
Required Things for Design Websites
- Site (Start Pont for Website like name and URL)
- Pages (Home, About Us, Services, Products and Contact Us)
- Page Layout (Arrange content in the page)
- Page content (Consist of Text, HTML, Images and Multimedia content Videos and Adios)
- Dynamic Functionality (Contact Us form, Document Sharing, Image Gallery, blogs and Wikis)
Well we have good clarity with respect to what we are going to do. Now we will achieve all above things from Liferay portal.
Once we install liferay in our machine we will access the liferay portal from following URL
Liferay have default super admin so we need to login into liferay portal by following credentials
Password: test |
Following is login screen

Site (Start Pont for Website like name and URL)
Liferay have one start point for website called Site and liferay site is point where we can accommodate content and dynamic functionality. It has name and access URL to identify the site. Initially site is blank place so we need to add content and functionality so that we can see it as live.
Liferay have very good Admin control panel to create site
Create Site in Liferay
Login as Admin with above specified credentials and navigate Admin Control Panel
The following is screen navigate to Liferay Admin Control Panel after Login

The following is Liferay Admin Control Panel

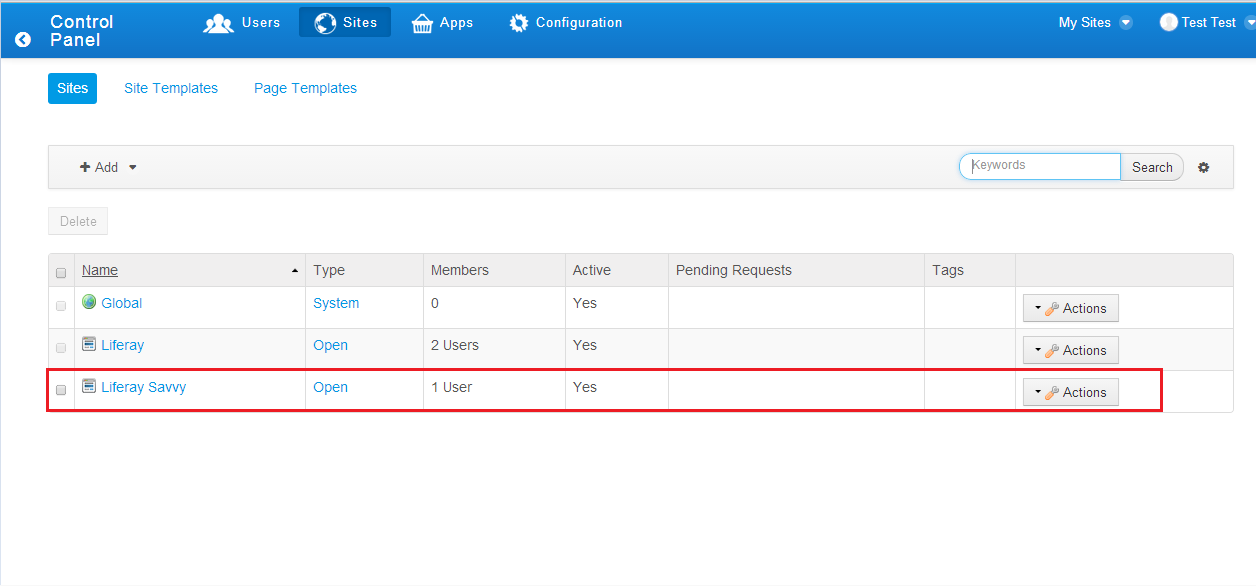
Now click on Sites Links in Sites Section then we can see Sites Management Screenthere we can see the already existed sites and we can have option to create new site.
The following sites management screen

Now we will create our own Brand New site in liferay say our site name is LIFERAY SAVVY.
Now click on +ADD button in the tab then we can see List of option from there select Blank Site.

Once we click on Blank Site then we will get Site Form there we need fill site details like name and description
The following is site form

Now fill Name and its description
Membership type is Open so that anyone can be member of the website.
Now click on save button then site will be created as soon as site crated then it will be navigate to Site Setting so that there are many option we can fill
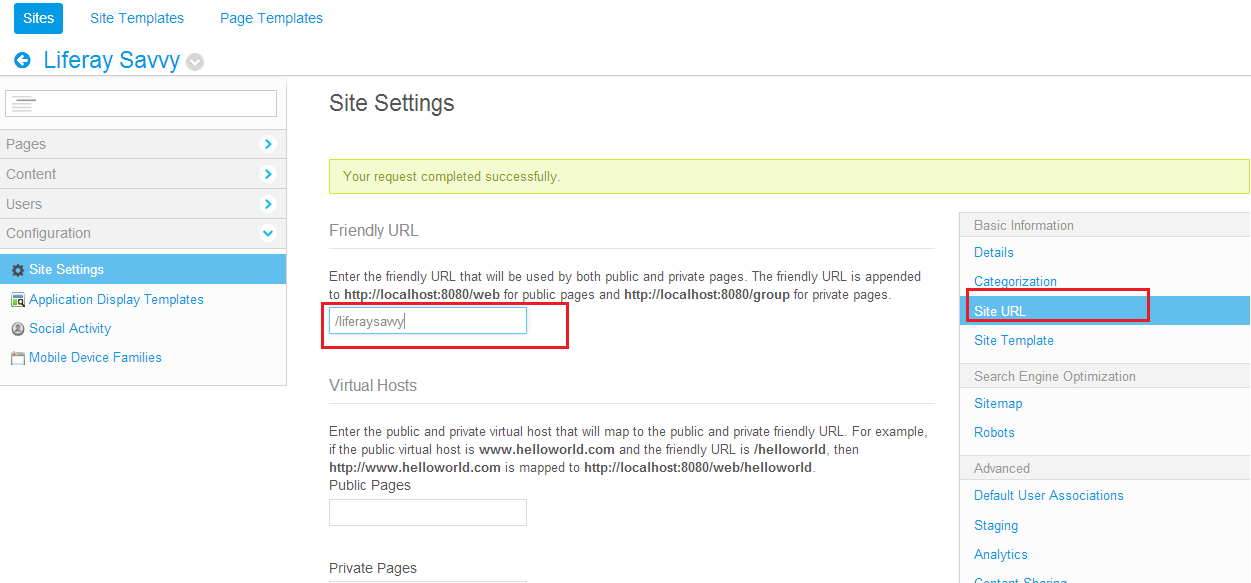
The following is Site Settings Page

In the above screen I am skipping all setting so that we don’t have more confusion.
Now consider only the part Site URL because we need access URL for our site
The following is Site URL Screen

Now we can see two sections one is Friendly URL and other is Virtual URL.
Friendly URL
Friendly URL is Sub Part of Main URL from that we can access our site. In the above part we can give any Friendly URL name in the Text Box generally it will take site name as default but we can change.
Assume Our Friendly URL is liferaysavvy then following is our web site access URL
Now in the text box enter liferaysavvy and save site setting then we can access our website with above URL
Now our site access URL is as follows
Note
Initially we don’t have any site pages so we may get some URL error so don’t worry because site already created but there are no site pages that are why we may get such error.
Pages (Home, About Us, Services, Products and Contact Us)
Now we have successfully created site in Liferay and its blank site and it don’t have any site pages.
Now we need create site pages like Home, About Us, Services, Products and Contact Us so that we can access website pages.
We have two types of Pages
- Pubic Pages
- Private Pages
Skip the Private Pages now we will see more about this later.
Pubic Pages are the accessible by any user and they can see the content in the pages and he can experience by pages and its content.
Create Site Pages in Liferay
Now go Admin Control Panel and Navigate to Sites management Screen then you can find our newly created site Liferay Savvy
Now click on Our Site then you can navigate Site Pages Management Screen as follows

In the above screen we have many sections.
Now we will concentrate on only on Site Pages Creation.
We already know we only choose public pages now so it is already selected default.
In left site you can see pages tree and top you can find panel there we can see + Add Page Button.
Now click on Add Page button you can get pop window

Simply Enter Only Name and Click on save button don’t consider anything at this movement and page will be created and it will be visible in page tree
Now create all pages as I said above and all will be visible in the pages tree as follows

Now if we click on any pages which are in tree view then we will get page details.
We have many details like name, friendly URL and Page Layout Type

If we want change any page details we can change and save then it will be updated.
Here we need to consider Page Friendly URL and Page Layout Type. Friendly URL is to access page with easy understanding name.
The following are the our pages URLs
Page Layout (Arrange the content in the page)
Page Layout will decide the content arrangement in the page like how many sections we need in the page.
Liferay have given many Layout Types so we can simple select layout type for the page so that we can arrange content according to the section which provided by layout. Section is like partition in the page.
Generally when we create any page default one layout type will be selected so if we want change layout then we click on page in tree view and we can change the page layout.
The following screen shows you how to change layout

Page content (Consist of Text, HTML, Images and Multimedia content Videos and Adios)
Page content consist of html content and multimedia content.
Liferay have given very robust Content Management Systemso that we can design content very easy.
Generally in normal web application we need to create HTML page to design page but in the Web content Management System we have CKEditor so that we can simply design content without knowledge of HTML but if we have idea then it will be value added to our design.
To design contend and arrange content in the page Liferay Have Given One Application/Portlet that is called Web Content Display portlet.
Before design content we need to add Web Content Display to page then we will design content.
First we need to navigate to our site called Liferay Savvy that is we already created.
The following is URL
OR we can go through as follows
Go to My Sites in top right (Dockbar) click on respective site (Liferay Savvy)

The following is Liferay Savvy Blank Site

Create/Design Content
Liferay we have 3 controls in Left side there we have many option to do like add new page, edit page and add applications to page.

Assume we are accessed Home page so in the left side control click on Edit icon then we can get small section there you can change Layout Type to home page that is current page.
Once we select desired layout type to page then click save then page will have selected layout.
Once we select desired layout type to page then click save then page will have selected layout.
Assume we have chosen 1-2 column layouts for home page.

We already know to add content or design web content in the page we need Web Content Display portlet. So first we need add Web Content Display Portlet to page.
To add Portlet to page click on Add (+)icon

Once we click ADD icon then will get small section in Left side as follows.

In the application tab we can see many portlet applications now we need Web content Display portlet .Simply Click on Add link then portlet will be added to the page.
The following is blank web content display portlet in page

We can also change Portlet position in the page layout once we drag the portlet in the page it will be changed.
When we drag the portlet as follows you can see the displacement of portlet.

Design Web Content in the Portlet.
Now we need to fill the Web Content Display Portlet with content.
In portlet bottom you can see the toggle button there you can see +Add Link

Once we click on Add link then we will get HTML Editor there we can design the content.

Now we have many controls in Html Editor so that we can design content like add images and add text and change colors and change font size. Based on your experience you can create content.
First we need to enter content title and then design content.
Assume we are adding one image for content so we have image icon in html editor click on image icon

Now we will get popup window there you can select brows from server

Now we will get Resource Browse window there we cans select image from Existed Liferay folder or we can upload new images.
Now consider upload new image so in the bottom we have upload image select your desired image. Before upload image we need to select the folder where we want upload. Please select Liferay Savvy Folder in folder tree.

Now the selected image will be appear in html editor. If we want edit image simply double click on image in Html editor then we can see new popup there we have image properties like height, width so that we can change image properties. Finally click on ok then image will be edited accordingly.

Now we are design banner image so we need only image. Finally click on publish button then web content will be created with banner image.
Final output as follows

To make to more look we simply disable border to the portlet so that it will be look better and also adjust image size.
To edit content simply click on edit link in the toggle which in portlet bottom after edit simply save then change will be saved.

To make look better now we will remover border to the portlet.
Now we need to go to portlet configuration for that we need to click on portlet configuration icon right top corner of the portlet.

In the configuration select look and feel link then we can change portlet look and feel with many options. For now we only think disable borders.
In the look and feel configuration popup select No option for Show borders finally save changes then portlet borders are not visible.

Following is End Use Look of website

Like this we can add many web content display portlet in page and design web content. We have many option in Html Editor we can design content like any thing.
We added more web content display portlets and we designed content so finally home page looks as follows

Liferay have very good web content management system so we can do anything and we can design anything.
Liferay provided Html Editor (CKEditor) is very powerful content designer so we have many features and options over there. More about web content management follow below link
Dynamic Functionality (Contact Us form, Document Sharing, Image Gallery, blogs and Wikis)
To add dynamic functionality to website liferay have given many portlet application simply add to page and we can use it.
More than 80 portlets, big community provided many portlet applications and liferay market place for free and paid portlet applications. We simply get it and use in our web application.
Example:
- Document Library
- Image Gallery
- Asset Publisher
- Wikis
- Blogs
The following are the portlet applications we can add to page

Change Logo
Well we have designed our site now we will change logo to our website.
Login as Admin
Navigate Admin Control Panel
Select Site Tab
Select desired Site Name and click on link
Once we select site then we will get Site Settings page there we can see Look and Feel Section from there we can see logo link

Click on logo link and upload your site logo and there we can see show site name check boxplease deselect it and save the changes. Now logo will be appeared in the header part of website.

The following is final Site

Note:
We have to explore many things so we will see all in the coming articles.
Related Links
Author
0 comments:
Post a Comment