
Introduction:
Liferay MVC is portlet development framework given by Liferay. We will use Liferay MVC framework to develop JSR 168&286 standards portlet and deploy into liferay portal. This frame work is liferay specific one and we can use in liferay portal.
Liferay IDE is eclipse Plugin and it as tool to develop liferay portlets by using different portlet frame work.
Liferay IDE has support for multiple portlet frameworks one of the frame work is Liferay MVC.
We will use Liferay IDE to develop Liferay MVC portlets.
Environment:
Liferay IDE 2.x+Eclipse (Kepler) +Liferay Plugins SDK 6.2+Tomcat 7.x Liferay Portal Bundle
Prerequisites
Note:
Follow above two articles before start this article.
Liferay IDE have different version like 1.x and 2.x we may expect some changes form version to version don’t worry almost same at the time of portlet development.
Once we done all steps in above article then we are ready with Liferay Development Environment with Liferay IDE.
Now we have to choose Liferay Prospective in the Eclipse.
The following is Liferay Prospective in Eclipse

Creating Liferay MVC Portlet with Liferay IDE
Step: 1
In the eclipse click on create new liferay project option in eclipse.
The following is screen show create new liferay project

Step: 2
In the Project Dialog we need provide project name, Display Name, Build Type, Plugins SDK and Server Environment.
Now select Plugin Type is Portlet and click on check box i.e. Include sample code and check the box i.e. Launch New Portlet Wizard after project is created, once we have done all click on Next
Follow the below screen

Note:
We have different built types and please select ANT type which is default one.
If you have multiple server environments then select your environment
If you have multiple Plugin SDKs then select your Plugins SDK.
Plugin type we have options like portlet, theme, layout, ext, web, hook and service builder portlet.
We are developing simple portlet so choose portlet Plugin type in select box.
We need check the check box Launch New Portlet Wizard after project is created so that we will get another widow after created the portlet and there we can give our custom portlet class name.
From Liferay IDE 2.x onwards Project Dialog window have many option at the time of portlet creation and this is different from older version of IDE.
Step: 3
Once we click on next in above step then we will get another dialog window here we need to select portlet development frame work.
We already know we are using Liferay MVC frame work. Now we need click on radio button Liferay MVC then click on finish.

Note:
As soon as you click on finish it will create Liferay MVC portlet and it will add all configuration files and it will create directory structure it will take few seconds to create all.
Step: 4
Once project is created you will get another Dialog Window there we need give the Custom Portlet Class Name and our class is extends the MVC Portlet class, finally click on next button.
Follow the screen below.
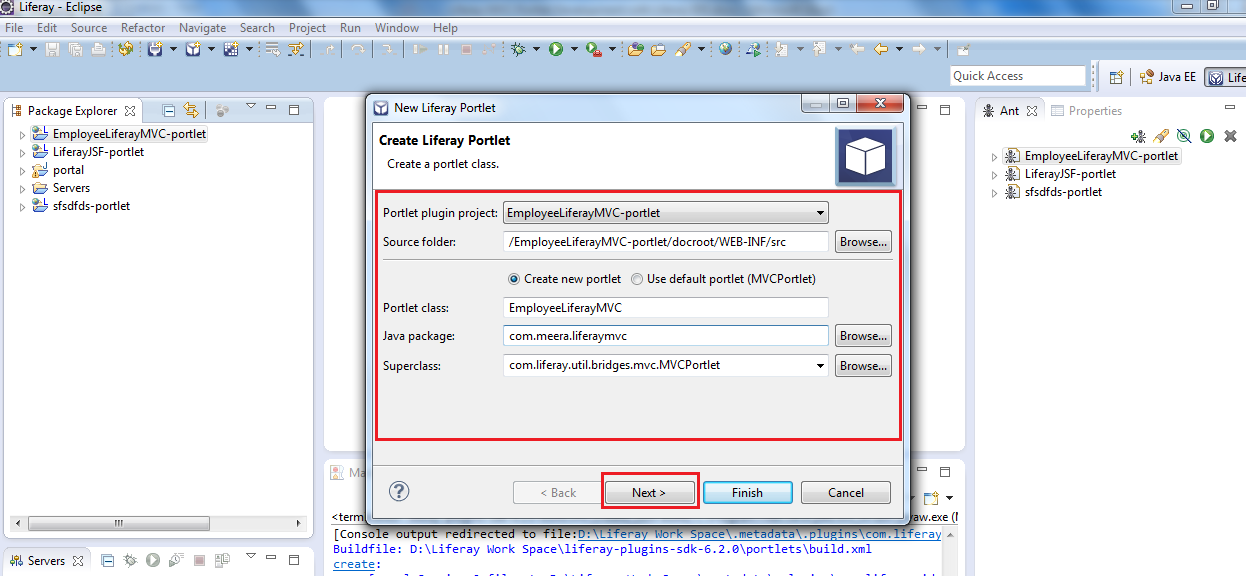
Note:
Select radio button Create New Portlet so that it will create portlet with our custom portlet class and it will be extended the MVCPortlet class.
Need to provide our Portlet class, Java Packages and Super class it’s MVCPortlet
Step: 5
Once we click on next in above step we will get another dialog there we have to provide some more information so that portlet will be created accordingly.

Once portlet is created you can see Portlet Project in Package Explored i.e. in left side of Eclipse IDE and Portlet related ANT build file i.e. you can see in ANT view which is right side of eclipse.
The following screen shows you Project and it ANT file

While Project creation as I said it will create all required portlet configuration files and its configurations as for the data we provided at time of project creation. It will also create the directory structured for the project.
Each Portlet project has its own ANT build file i.e. build.xmlfile and this build file have different targets to deploy the portlet into liferay portal.
The following is screen shows Project Directory Structure and ANT build Targets.

Note:
At time of project creation it will create one default portlet after that we have another dialog window there we have created new portlet and there we provided our custom class name, so totally we can see two portlets.
Here we can ignore default portlet or you can remove default portlet configuration form portlet.xml, liferay-portlet.xml and liferay-display.xml files.
When we use Liferay IDE 2.x we can see above scenario.
Portlet Deployment:
When we create portlet project then each project has ANT build file i.e. build.xmlfile, it has ant targets to deploy the portlets in liferay portal servers.
In the eclipse if we see in ANT view right side, you can see portlet project build file. If you e open tree view then you can see all available ANT targets for the portlet project.

In the available targets one should be default one that is you can see different color in the ANT view.
We will use ant deploytarget to deploy the portlet in liferay portal server.
Simply double click on deploy target in the eclipse ANT view so that portlet will be deployed into liferay portal server that is tomcat or Jboss
When we run deploy target all log message you can see in eclipse console view.

If no compile time error then it will show build success message otherwise it show compiles time errors in the console.
If build success then it will be packages as war file and deployed into liferay deploy directory.
As soon as war file places in liferay deploy directory auto deploy scanner will copy the portlet into server deployment directory and it will be extracted in deployment directory then portlet available in the application so that we use it.
Start Liferay portal Server
Before you deploy the portlet your liferay portal server should be start mode.
We can also start server from eclipse that is configures servers in servers views you can simple click on start option then server will be start.

Once we successfully deployed portlet and start the server then portlet available to add in page.
Using Portlet:
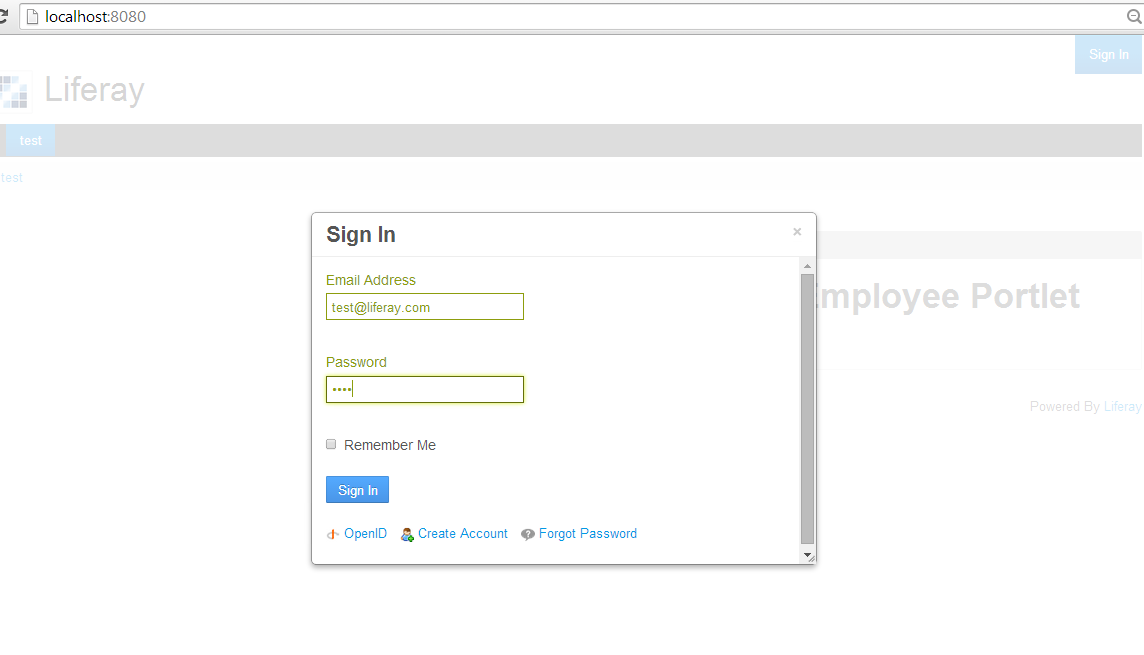
Access Liferay portal using you host name port
http://localhost:8080
Generally when create portlet then it will be available in sample category default. We already know at time of creation we will provide the category we can find there.
Login as liferay admin in liferay portal in the application section you can see the sample category.
The following is login screen
Add portlet to page

Added portlet to page

Now if we want developed code or modify/add jsps we can do it for project and need to deploy again so that changes will be applied portlet.
Important Points
- When we create project from eclipse it will create all basic configuration files and required directory structure for the portlet project.
- Configuration files are like portlet.xml, liferay-portlet.xml, liferay-disply.xml file and web.xml and all these are available in WEB-INF directory.
- Portlet class is available in src directory we can modify.
- Jsp pages are available in the path we specified in project creation so that we can add new jsp pages or we can modify existed jsp pages that are default jsp page.
- As we already know portlet class should extends MVC Portlet class so that we can call it as Liferay MVC Portlet
- When we run ant deploy target first all java classes will be compiled and packages as war file then placed in liferay deploy directory.
- As soon as it will be placed in deploy directory then auto deploy scanner will add additional configurations to the portlet and placed into server deployment directory then portlet available
More Details about Liferay MVC Portlet Please go through following Articles
Note:
MVC Portlet is default portlet in liferay and we will have many choicesportlet, JSF, Struts Portlet or Spring Portlet
Portlet Anatomy/Directory structure
The following is portlet directory structure

In Main Project parent directory we have docroot and build.xml file available.
Build.xml file for build the liferay portlet and it is any file so that we can deploy the portlet.
In Liferay all files and directories will be places in docroot
In side docroot we have WEB-INF and this will contains all xml files, classes and lib directory and also src directory for java classes.
Jsp pages will be available in direct docroot.
docrootis directory just for development conveniences after packaged as war file docroot will be excluded.
You can add more code samples which I have given in previous articles and you can download from my source forge location.
Download Liferay MVC Portlet Examples
Employee Liferay MVC Portlet Code samples
Web.xml
<?xml version="1.0" encoding="UTF-8"?> <web-app id="WebApp_ID" version="2.5" xmlns="http://java.sun.com/xml/ns/javaee" xmlns:xsi="http://www.w3.org/2001/XMLSchema-instance" xsi:schemaLocation="http://java.sun.com/xml/ns/javaee http://java.sun.com/xml/ns/javaee/web-app_2_5.xsd"> </web-app> |
Portlet.xml
<?xml version="1.0"?> <portlet-app xmlns="http://java.sun.com/xml/ns/portlet/portlet-app_2_0.xsd" xmlns:xsi="http://www.w3.org/2001/XMLSchema-instance" xsi:schemaLocation="http://java.sun.com/xml/ns/portlet/portlet-app_2_0.xsd http://java.sun.com/xml/ns/portlet/portlet-app_2_0.xsd" version="2.0"> <portlet> <portlet-name>Employee Liferay Mvc</portlet-name> <display-name>Employee Liferay Mvc</display-name> <portlet-class> com.meera.liferaymvc.EmployeeLiferayMVC </portlet-class> <init-param> <name>view-template</name> <value>/html/jsps/view.jsp</value> </init-param> <expiration-cache>0</expiration-cache> <supports> <mime-type>text/html</mime-type> <portlet-mode>view</portlet-mode> </supports> <portlet-info> <title>Employee Liferay Mvc</title> <short-title>Employee Liferay Mvc</short-title> <keywords></keywords> </portlet-info> <security-role-ref> <role-name>administrator</role-name> </security-role-ref> <security-role-ref> <role-name>guest</role-name> </security-role-ref> <security-role-ref> <role-name>power-user</role-name> </security-role-ref> <security-role-ref> <role-name>user</role-name> </security-role-ref> </portlet> </portlet-app> |
Liferay-portlet.xml
<?xml version="1.0"?> <!DOCTYPE liferay-portlet-app PUBLIC "-//Liferay//DTD Portlet Application 6.2.0//EN" "http://www.liferay.com/dtd/liferay-portlet-app_6_2_0.dtd"> <liferay-portlet-app> <portlet> <portlet-name>Employee Liferay Mvc</portlet-name> <icon>/icon.png</icon> <header-portlet-css>/css/main.css</header-portlet-css> <footer-portlet-javascript> /js/main.js </footer-portlet-javascript> <css-class-wrapper> employee liferay mvc-portlet </css-class-wrapper> </portlet> <role-mapper> <role-name>administrator</role-name> <role-link>Administrator</role-link> </role-mapper> <role-mapper> <role-name>guest</role-name> <role-link>Guest</role-link> </role-mapper> <role-mapper> <role-name>power-user</role-name> <role-link>Power User</role-link> </role-mapper> <role-mapper> <role-name>user</role-name> <role-link>User</role-link> </role-mapper> </liferay-portlet-app> |
Liferay-display.xml
<?xml version="1.0"?> <!DOCTYPE display PUBLIC "-//Liferay//DTD Display 6.2.0//EN" "http://www.liferay.com/dtd/liferay-display_6_2_0.dtd"> <display> <category name="category.sample"> <portlet id="Employee Liferay Mvc"></portlet> </category> </display> |
Portlet Action Class (EmployeeLiferayMVC.java)
package com.meera.liferaymvc; import java.io.IOException; import java.util.HashMap; import java.util.Map; import javax.portlet.ActionRequest; import javax.portlet.ActionResponse; import javax.portlet.PortletException; import com.liferay.portal.kernel.util.ParamUtil; import com.liferay.util.bridges.mvc.MVCPortlet; public class EmployeeLiferayMVC extends MVCPortlet { public void addEmployee(ActionRequest actionRequest, ActionResponse actionResponse) throws IOException, PortletException { String employeeName = ParamUtil.getString(actionRequest, "employeeName"); String employeeAddress = ParamUtil.getString(actionRequest, "employeeAddress"); Map<String, String> employeeMap = new HashMap<String, String>(); employeeMap.put("employeeName", employeeName); employeeMap.put("employeeAddress", employeeAddress); actionRequest.setAttribute("employeeMap", employeeMap); actionResponse.setRenderParameter("mvcPath","/html/jsps/displayEmployee.jsp"); } } |
Default portlet view page i.e. view.jsp (/html/jsps/view.jsp)
<%@ taglib uri="http://java.sun.com/portlet_2_0" prefix="portlet" %> <portlet:defineObjects /> <portlet:renderURL var="addEmployee" windowState="normal"> <portlet:param name="mvcPath" value="/html/jsps/addEmployee.jsp"/> </portlet:renderURL> <h1>Welcome to Liferay MVC Employee Portlet</h1> <a href="<%=addEmployee.toString()%>">Add Employee</a><br/> |
Add employee jsp page (/html/jsps/addEmployee.jsp)
<%@ taglib uri="http://java.sun.com/portlet_2_0" prefix="portlet" %> <portlet:defineObjects /> <portlet:actionURL var="addEmployeeActionURL" windowState="normal" name="addEmployee"> </portlet:actionURL> <h1> Add Employee</h1> <form action="<%=addEmployeeActionURL%>" name="emplyeeForm" method="POST"> Employee Name<br/> <input type="text" name="<portlet:namespace/>employeeName" id="<portlet:namespace/>employeeName"/><br/> Employee Address<br/> <input type="text" name="<portlet:namespace/>employeeAddress" id="<portlet:namespace/>employeeName"/><br/> <input type="submit" name="addEmployee" id="addEmployee" value="Add Employee"/> </form> |
Display employee jsp page (/html/jsps/displayEmployees.jsp)
<%@page import="java.util.Map"%> <%@ taglib uri="http://java.sun.com/portlet_2_0" prefix="portlet" %> <portlet:defineObjects /> <h1>Display Employee Details</h1> <% Map<String,String> employeeMap=(Map<String,String>)renderRequest.getAttribute("employeeMap"); if(employeeMap!=null){ %> Emplyee Name: <%=employeeMap.get("employeeName")%> <br/> Emplyee Address: <%=employeeMap.get("employeeAddress")%><b/> <%}%> |
The following are portlet application screens
Portlet screen

Add employee screen

Display Employee Details Screen

Create Liferay Portlet Project form existing source with Liferay IDE
Before we have seen creating New Portlet Project with Liferay IDE and Eclipse now we will see create liferay portlet from existing source.
Generally we can download many portlet examples from different places we want use it in our development we need create project from existed source code.
Step: 1
We need place the downloaded portlet or source portlet in Liferay Plugins SDK portlets directory.
Example: D:\Liferay Work Space\liferay-plugins-sdk-6.2.0\portlets |
Step: 2
Now open project directory and delete all environment related configuration files like .classpath, .project, .settings.
These files are related to previous developed environment configuration so we don’t need these files so simply delete.

Step: 3
Go to eclipse and click on create Liferay project there we need select create new liferay project from existing source code option.

Step: 4
Now browse project location which in Liferay Plugins SDK portlets directory.
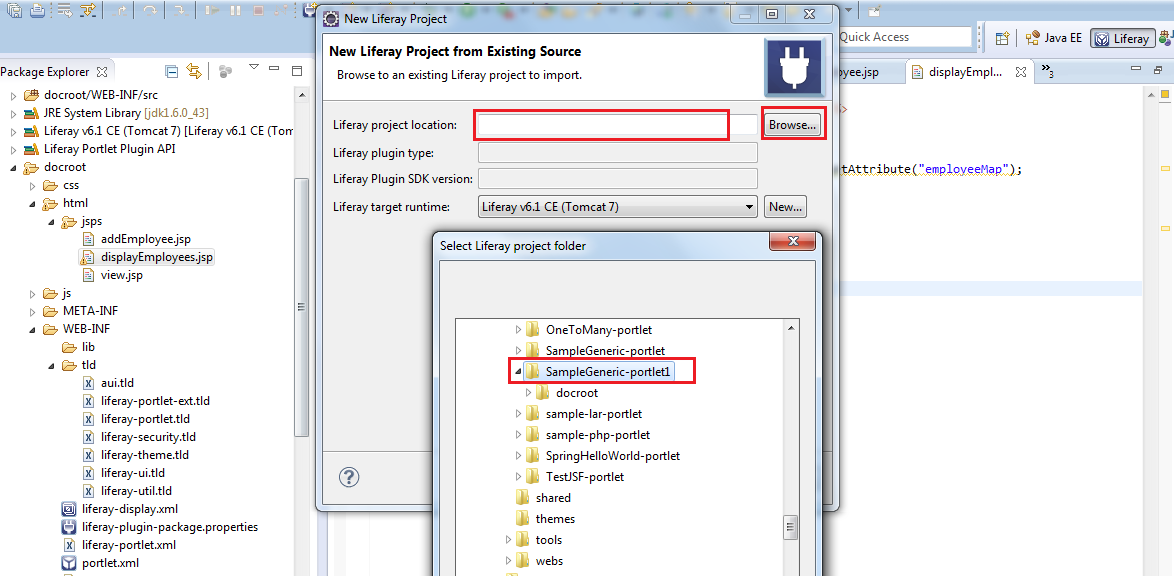
Once we select the project then click on finish button then portlet project will be created from existing source code and that will be visible in package explorer right side.
Step: 5
Now we need to add ant build file to ANT vies so that we can run ant commands.
Simply open project in package explorer and find ant build file then drag and drop build.xml in ANT view that is in right side

Now we can run ant targets by simply double click on targets in ANT view.
If you have any environmental Challenges go through following link
Author
0 comments:
Post a Comment